Visual Studio Code
Visual Studio Code is a lightweight code editing environment that supports C, C++, Python (among many others) and has integrated debugging and Git support. It handles Blender's large sources very well (compared to other text editors and IDE's, especially on Linux).
It is available for Windows, macOS and Linux.
Although VS Code will work on Windows, supporting it is taking more resources than available right now, using regular Visual Studio is recommended, the instructions below are only tested on Linux macOS and adjustments may be required for Windows.
This page shows how to setup VSCode for both C/C++ Blender development and for Python add-on development. It assumes that you have already cloned and built Blender on your machine.
Installation and Introduction
There are a few versions to choose from when downloading VSCode:
- Standard pre-built version with proprietary license and End User Agreement: https://code.visualstudio.com/
- Build the free and open source version on GitHub: https://github.com/Microsoft/vscode
- Open Source builds without tracking from VSCodium https://vscodium.com/
To build the free and open source version from GitHub, go through the following:
Building VSCode from source
1. Make sure you have the dependencies listed in the following instructions: https://github.com/Microsoft/vscode/wiki/How-to-Contribute
2. Clone the repository and compile:
Note: to update your installation, simply git pull and re-run the
above commands except for clone.
3. To install extensions, you will also need to manually enable the
marketplace extension gallery by adding the following to
~/vscode/product.json;
If you are unfamiliar with VSCode or would like to learn more about basic settings, read the following:
Basic VSCode Configuration
In File \> Preferences \> Settings you can find a multitude of
settings and commonly used options to set VSCode to your liking.
If you downloaded VSCode from Microsoft, you might want to opt out of sending data to Microsoft as that is the default.
    "telemetry.enableTelemetry": false,     // disable data sending to Microsoft
    "telemetry.enableCrashReporter": false,
    "extensions.autoUpdate": false,         // update only by choice
You can configure VSCode to use your favorite editor shortcuts in
File > \> Preferences \> Keymaps, before fine-tuning specific keys.
To learn the basics and other tips and tricks, read the VSCode Getting Started Page, or the Tips and Tricks Page.
For more information on using VSCode with C/C++, read the documentation for the C/C++ Extension.
VSCode contains many preferences which can be modified both globally
(User) and per project (Workspace). When a folder is opened in VSCode a
.vscode subfolder is created for workspace settings. To modify
settings go to File \> Preferences \> Settings and select either the
User or Workspace tab. The remainder of the guide assumes modifications
in the Workspace tab, but you may make changes globally if preferred.
Additionally, View \> Command Palette or Ctrl+Shift+P will open
the Command Palette which is useful to run various commands quickly.
Setup for Core Blender Development
Launch VSCode and open Blender as a workspace (navigate to the blender
repository in File \> Open Folder). This will create a .vscode
folder within your Blender source directory to store caches and
workspace specific settings for VSCode.
Install the following extensions View \> Extensions:
- C/C++ (
ms-vscode.cpptools) - language support for C and C++ - Python (
ms-python.python) - support for the Python language for UI, keymap, and other scripts.
The following extensions are not required, but may be useful:
- CMake (
twxs.cmake) - language support for CMake files (syntax highlighting, etc) - Git Lens (
eamodio.gitlens) - Useful to see who changed what and when. - Explicit Folding (
zokugun.explicit-folding) - Useful to configure Blenders code-folding style.
ClangFormat
In the past an additional extension was recommended for clang-format support, this is no longer required. The C/C++ extension comes with clang-format support which can be enabled in the VSCode settings.
Enter the workspace settings
(reminder, File \> Preferences \> Settings), and select the Workspace tab.
A search for format should filter to a field for Editor: Default Formatter.
Select ms-vscode.cpptools as the code formatter.
This will configure the VSCode built-in formatter to use clang-format from the C/C++ extension.
At the very least also check the box for Editor: Format On Save,
and you may find Editor: Format On Paste or other options useful.
Blender comes with a specific clang-format executable that can be found in:
blender-git/blender/lib/<platform-name>/llvm/bin- e.g.
~/blender-git/blender/lib/linux_x64/llvm/bin/clang-format
In order for the formatting to be correct, VS-Code needs to be pointed to that. In the settings for the C/C++ extension, make sure that:
- C_Cpp: Clang_format_style is set to
file - C_Cpp: Clang_format_path points to the clang-format executable in the path mentioned before.
Now every time you save a file in the workspace it will be automatically formatted properly.
C/C++ Intellisense
The C/C++ extension generally does a wonderful job with Blender's sources, but it needs some additional configuration in some cases.
Compile Commands
If CMAKE_EXPORT_COMPILE_COMMANDS is enabled in CMake, a
compile_commands.json file is created in the build directory. The C/C++
extension can use this file to know the current include paths and build
options. In the Settings search for compileCommands will find
C_Cpp > Default: Compile Commands. Set this to the path to the
location of the compile commands file, e.g.
~/blender-git/build_linux/compile_commands.json.
Defines
Occasionally a file uses some macro or include that the engine cannot
locate such as preprocessor macros that are defined during compilation.
As an example, Cycles source files have CCL_NAMESPACE_BEGIN near the
top of the file. The C/C++ extension marks these macros as invalid as
the intellisense engine cannot find an definition within the workspace.
Unfortunately the remainder of the file is highlighted with false error
messages. To remedy this, there is a c_cpp_properties.json file
which contains a list of these compile-time definitions. To edit this
file, enter C/C++: Edit configurations (JSON) in the command
palette. In the file, list any macros that you encounter that are not
defined within the workspace. Other tweaks can be made in this file to
list external headers, set intellisense mode, or change the standard for
C/C++.
{
    "configurations": [
        {
            ...

            "defines": [
                "CCL_NAMESPACE_BEGIN=",
                "CCL_NAMESPACE_END=",
                 ...
            ],

            "compilerPath": "/usr/bin/gcc",
            "intelliSenseMode": "gcc-x64",
            "cStandard": "c99",
            "cppStandard": "c++17"
        }
    ],
    "version": 4
}
Once this is done, Blender's sources can be easily edited with C/C++ code hints and IntelliSense, and will ensure that your style conforms to the current code style guide in Blender. The remainder of this guide is optional if you prefer to build from the terminal and use an external debugger.
Explicit Folding
Blender uses a code-folding style that is not commonly used. In order to
get it to work, some configuration needs to be done. The next has to be
added to the user settings.json.
{
    ...
    "editor.defaultFoldingRangeProvider": "zokugun.explicit-folding",
    "editor.foldingStrategy": "auto",
    "explicitFolding.rules": {
        "c": {
            "begin": "\\{",
            "end": "\\}"
        },
        "cpp": {
            "begin": "\\{",
            "end": "\\}"
        }
    }
}
Building Blender
To set up a Task in VSCode to build Blender, a tasks.json file needs
to be created in the workspace. In the command palette
(ctrl+shift+p) search for "Tasks: Configure Task". Then choose to
create a tasks.json file from a template. Then choose default. The
workspace tasks.json file will be opened. This is a powerful feature
of VSCode that allows you to create tasks that can be run frequently. To
create a task to build Blender, edit the file to resemble the following:
{
    // See https://go.microsoft.com/fwlink/?LinkId=733558
    // for the documentation about the tasks.json format
    "version": "2.0.0",
    "tasks": [
        {
            "label": "Build Blender",
            "type": "shell",
            "command": "make",
            "group": "build"
        }
    ]
}
Because this task is in the group "build", it will be shown in a
list of tasks when ctrl+shift+b is pressed to show the build tasks.
Choosing "Build Blender" from the dropdown when ctrl+shift+b is
pressed will run the command, in this case make. If you find any
other commands you frequently run, they can be added to the
tasks.json file. If any tasks you create are not within the group
"build" then they will not show up by pressing ctrl+shift+b.
Either use Terminal\>Run Task or from the Command Palette search
for "Tasks: Run Task". This will show a list of all tasks you have
created.
Debugging Blender on Linux/macOS
VSCode features a simple and intuitive interface for debugging. It
requires an external debugger to be installed (GDB/LLDB). There are many
ways to attach Blender to VSCode for debugging. A simple command to
launch your build for debugging is easy to set up. Ensure that you have
built Blender with debugging symbols by editing the CMake settings. In
<build-dir>/CMakeCache.txt, change CMAKE_BUILD_TYPE from
Release to Debug. Then rebuild Blender.
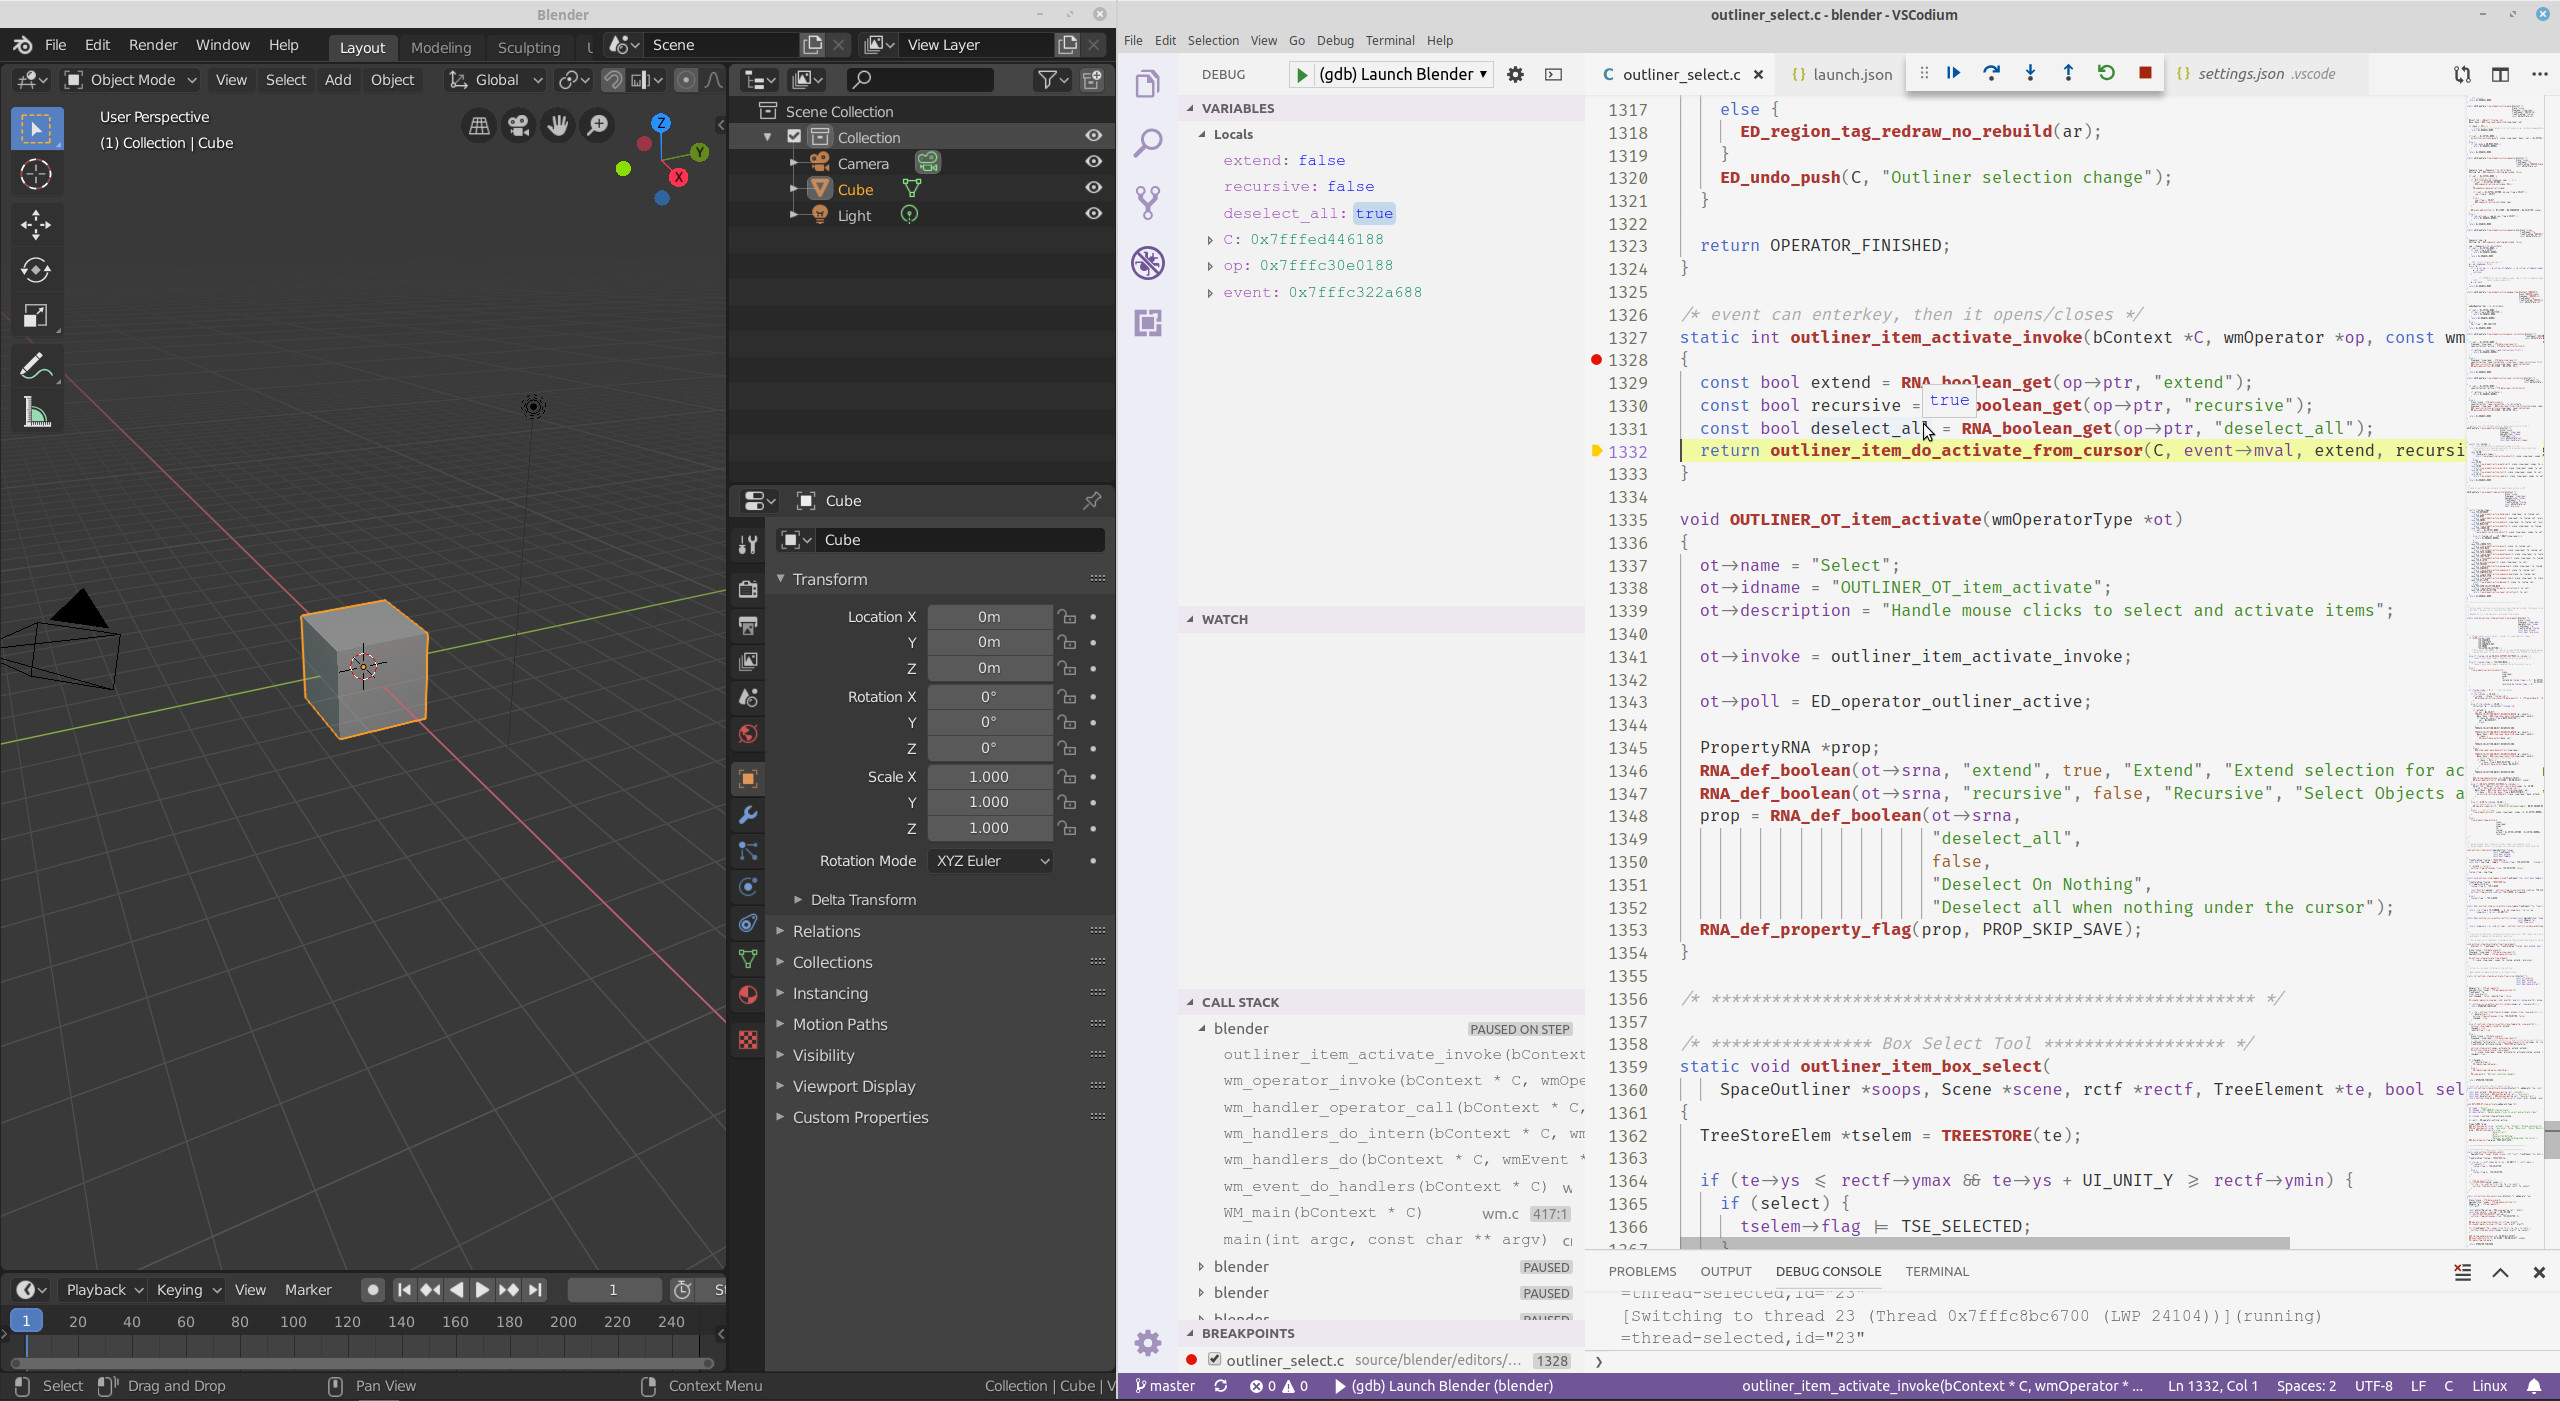
To open the debugging area press Ctrl+Shift+D or find the icon on
the left panel. From the debugger area click the gear in the upper right
hand corner. Choose your build environment from the dropdown menu. From
the second menu choose Default Configuration. The launch.json file
will open. This file is located in the workspace and can contain
multiple configurations on how to launch Blender from VSCode. For a
simple setup, edit launch.json to look like the following, editing
name to a name of your choosing, and program to point to your
build of Blender.
{
    // Use IntelliSense to learn about possible attributes.
    // Hover to view descriptions of existing attributes.
    // For more information, visit: https://go.microsoft.com/fwlink/?linkid=830387
    "version": "0.2.0",
    "configurations": [
        {
            "name": "(gdb) Launch Blender",
            "type": "cppdbg",
            "request": "launch",
            "program": "${workspaceFolder}/../build_linux/bin/blender",
            "args": [],               // You could place a .blend file path here to open it by default, or any other Blender args
            "stopAtEntry": false,
            "cwd": "${workspaceFolder}",
            "environment": [],
            "externalConsole": false, // This could be set to true if you prefer an external console for debugging
            "MIMode": "gdb",
            "setupCommands": [
                {
                    "description": "Enable pretty-printing for gdb",
                    "text": "-enable-pretty-printing",
                    "ignoreFailures": true
                }
            ],
            // Optional; Used to better visualize (some of) blenders built-in data types during debugging
            "visualizerFile": "${workspaceFolder}/tools/utils_ide/natvis/Blender.natvis",
                    "showDisplayString": true,
            "preLaunchTask": "Build Blender" // Optional; you can use if you want it to build before launching
        }
    ]
}
Some configuration settings may be different on different operating systems. This configuration shows Linux.
The pre-launch task is a helpful tool if you want to build before launching gdb. Another helpful idea would be to create multiple launch configurations, one to launch with gdb, and one to build before launching.
Once launch.json is saved, press F5 or click the green start button
from the Debugger area to launch Blender and begin debugging.
Breakpoints can be set like any standard debugger, and variables can be
viewed as Blender is running.
That is all it takes to get VSCode configured for a simple C/C++ development environment with debugging for Blender. There are many more extensions and settings that can aid in development and make VSCode more comfortable for you to use. Read the sections below for more advanced instructions on using VSCode for Blender development.
CMake Setup
To set CMake configurations from within VSCode, first install the following:
- CMake Tools (
twxs.cmake) - workflow tools for CMake (documentation)
Command Palette (Ctrl+Shift+P):
> CMake: Scan for Kits
> CMake: Select a Kit
> CMake: Set the current build variant
> CMake: Configure
> CMake: Select a Target to Debug
Connect the Cpp and CMake Tools extensions
This step is needed so that the Cpp Extension, which does the syntax highlighting and symbol lookup, knows what is the current CMake setup in regard to the include paths and variables (eg. WITH_CYCLES).
1. File Search (Ctrl+P) for c_cpp_properties.json (should be in
the project's .vscode folder).
2. Find the configuration you are using (eg. "Linux") and add the path
to the file compile_commands.json that is generated by CMake in the
blender-build folder. Example:
   "name": "Linux",
    ....
   "compileCommands": "/home/fergy/workspace/blender/blender-build/compile_commands.json",
Running Blender
To launch Blender with F5, you can setup the executable to launch in
VSCode's launch settings.
1. Command Palette (Ctrl+Shift+P): \> Debug: open launch.json
2. Add the path to the program and optionally some command line
arguments:
Git Integration
TODO