From BlenderWiki
http://projects.blender.org/pipermail/bf-blender-cvs/2006-October/007901.html http://blenderartists.org/forum/showthread.php?t=81488
Blender Artists Threads
http://blenderartists.org/forum/showthread.php?t=81488 http://blenderartists.org/forum/showthread.php?t=88419 http://blenderartists.org/forum/showthread.php?t=89004
=========================================
Apparent "perpendicular burp" to the OffsBone problem :
Ok, never mind it's not a bug.
What happens is if the "Offsbone" moves "vertically" during the action, i.e. if the bone is not oriented at a 90deg angle, then even if it is keyframed to move "only" on the Y axis for example, and even if the LocZ IPO is flat or non existent, there will still be LocZ momvement repeated because the ending (apparent) "LocZ" in the action is not the same as the starting LocZ.
The transform properties shows 0.00 for the LocZ all through the action, (because technically it is 0.00 in local pose space, even though visually it's moving downward !
So, though a torso bone is convenient and will work for most cases of walk cycles, if a "robotic" or other type movement is desired, the user should ensure that the OffsBone is not rotated in EDIT mode unless that is what is desired.
___________________________________________________________________________________ From CVS 2006-10-31 http://projects.blender.org/pipermail/bf-blender-cvs/2006-October/007901.html
Log:
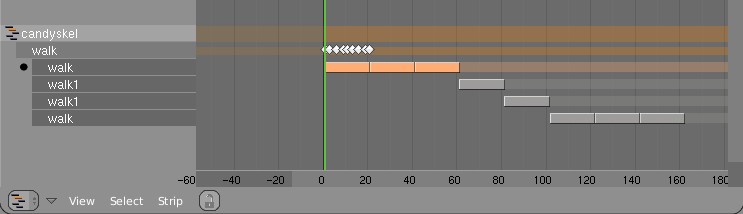
 Two wonderful new NLA & Armature editing features!

 - FORWARD CYCLING & MATCHING

 Up to no now, adding multiple actions in NLA with walkcycles required to
 animate them standing still, as if walking on a conveyor belt. The stride
 option then makes the object itself move forward, trying to keep the foot
 stuck on the floor (with poor results!).
 This option now allows to make walk cycles moving forward. By
 indicating a reference Offset Bone, the NLA system will use that bone to
 detect the correct offset for the Armature Pose to make it seamlessly going
 forward.

 Best of all, this option works as for cyclic Action Strips as well as for
 individual Action Strips. Note that for individual strips, you have to set
 the strip on "Hold". (Might become automatic detected later).

 Here's an example edit image for NLA:
 http://www.blender.org/bf/nla_match-cycle.jpg
 And the animation for it:
 http://download.blender.org/demo/test/2.43/0001_0150_match.avi
 Blender file:
 http://download.blender.org/demo/test/2.43/mancandy_matching.blend

 Using this kind of cycling works pretty straightforward, and is a lot
 easier to setup than Stride Bones.

 To be further tested:
 - Blending cycles
 - matching rotation for the bones as well.

 - ACTION MODIFIERS (motion deformors)

 The above option was actually required for this feature. Typically walk
 cycles are constructed with certain Bones to be the handles, controlling
 for example the torso or feet.
 An Action Modifier allows you to use a Curve Path to deform the motion of
 these controlling bones. This uses the existing Curve Deformation option.
 Modifiers can be added per Action Strip, each controlling a channel (bone)
 by choice, and even allows to layer multiple modifiers on top of each other
 (several paths deforming motion). This option is using the dependency graph,
 so editing the Curve will give realtime changes in the Armature.

 The previous walkcycle, controlled by two curves:
 http://download.blender.org/demo/test/2.43/0001_0150_deform.avi
 Blender file:
 http://download.blender.org/demo/test/2.43/mancandy_actiondeform.blend

 Action Modifiers can be added in the NLA Properties Panel. Per Modifier you
 have to indicate the channel and a Curve Object. You can copy modifiers from
 one strip to another using CTRL+C (only copies to active Object strips).

 Setting up a correct Curve Path has to be carefully done:
- Use SHIFT+A "Curve Path" in top view, or ensure the path is not rotated.
 - make sure the center point of the Curve Object is at the center of the
   Armature (or above)
- move the first point of the curve to the center point as well.
 - check if the path starts from this first point, you can change it using
   (in Curve EditMode) the option Wkey -> "Switch Direction"
 - Make sure alignment uses the correct axis; if the Armature walks into
   the negative Y direction, you have to set in Object Buttons, "Anim settings"
   Panel, the correct Track option. (Note; option will probably move to the
   Modifier later).

 This is a good reason to make such paths automatic (on a command). Is on the
 todo list.

 Also note this:
 - the Curve Path extends in beginning and ending, that's (for now) the default,
   and allows to use multiple paths. Make sure paths begin and end horizontal.
 - Moving the Curve in Object Mode will change the "mapping" (as if the landscape
   a character walks over moves). Moving the Curve in Edit Mode will change the
   actual position of the deformation.
- Speed (Ipos) on paths is not supported yet, will be done.
- The Curve "Stretch" deform option doesn't work.
 - Modifiers are executed *after* all actions in NLA are evaluated, there's no
   support yet for blending multiple strips with Modifiers.
 - This doesn't work yet for time-mapping...

 This commit is mostly for review by character animators... some details or
 working methods might change.
 This feature can also be used for other modifiers, such as noise (Perlin) or
 the mythical "Oomph" (frequency control) and of course Python.
