Blender 2.80: Modeling
Multi-Object Editing
Entering edit-mode now takes all selected objects into account, making operations such as UV unwrapping or recalculating normals possible without manually entering edit-mode on each or writing scripts.
This currently works for pose and edit modes.
Usage
- Selecting multiple objects then entering edit-mode will enter the mode for all compatible objects.
- The active object is used for displaying properties such as shape keys, UV-layer and modifiers.
- The active object is used for adding new geometry (primitives for example).
- Selection by picking (vertex/edge/face) will activate the object as well.
- Objects can be added or removed from the current mode using the outliner's context menu.
Known Limitations
- Objects must be the same type (editing a mesh and an armature at the same time isn't supported).
- Operations such as creating an edge or face between two different objects aren't supported.
- Actions such as manipulating UV/vertex layers and shape keys only apply to the active object.
- Grease pencil edit-mode is not yet supported.
- While the majority of tools have been ported, there are some features which do not yet have support for multi-object editing, see: #54641. Notably...
:* Edit-Mesh Knife Tool
:* Edit-Mesh Select Similar Regions
Custom Normal Tools and Modifier
Custom Split Normal tools and a Weighted Normal modifier were added. These tools and the modifier offer more options for adjusting custom split normals.
All of these tools and modifier only work if custom split normals are enabled, which you can do by checking the Auto Smooth option in the Mesh data properties, Normals section.
Weighted Normal Modifier Usage
- Add a Weighted Normal modifier to the object.
The Weighting Mode says how to make a weighted average from the normals of the faces around a vertex:
- Face Area: Weighted according to face area. Larger area implies more weight.
- Corner Angle: Weighted according to the angle each face makes at the vertex. This method is default weighting mode of blender.
- Face Area - Corner Angle: Weights are a product of face area and corner angle.
Further control of the weighting depends on these two parameters:
- Weight: Determines how strongly the weights are biased according to the face areas and/or corner angles. A value of 50 means all faces are weighted equally. More than 10 means faces with higher area or angles are given even more weight. Less than 50 means faces with higher area or angles are given lesser weights.
- Threshold: A weight-rounding threshold: if two angles or areas differ by less than the threshold then they will get equal weights.
Other parameters:
- Vertex Groups: If a vertex group is specified here, the modifier will only affect those vertices.
- Keep Sharp: This option tells the modifier to respect sharp edges, though smoothing will still happen if there are multiple faces between any two sharp edges.
- Face Influence: Use face weights (weak, medium, or strong) as assigned by Custom Normal Tools. See the Set Strength command (below) for how to set the face strengths.
Custom Normal Tools Usage
The custom normal mesh edit tools can affect all normals (the default), or only selected ones. To select a custom normal associated with a particular vertex and face:
- Make the element selection mode both Vertex and Face (use shift-click to enable the second one).
- First select one or more vertices, then select a face. This can be repeated to select more vertices and a different face. And so on.
It is easiest to see the effect of these tools if you turn on the Edit Mode Overlays option 'Display vertex-per-face normals as lines'.
Rotate Normals
The transform key R when followed by an N will rotate the selected custom normals according to mouse movement. Also available as menu item Mesh->Normals->Rotate normal.
Point Normals To Target
The modal Point Normal To Target command (menu Mesh->Normals->Point normals to target; Alt-L in default keymap) edits all or selected custom normals as selected during the modal operation.
- A target is set by keys M (the mouse), L (the pivot), O (the object origin), Control-Left-Mouse (the cursor, set at this click), or Control-Right-Mouse (a mesh item selection, set by this click).
- When confirmed by Enter or Left-Mouse, all selected normals are set to
point from their vertex to the target; but this can be modified:
- If A (align) has been previously pressed, then all normals will point in the same direction: from the center of selected points to the target.
- If S (spherize) has been previously pressed, then each normal will be an interpolation between its original value and the direction to the target.
- If I (invert) has been previously pressed, then the normal directions are reversed from what was specified above.
- An R press will reset the custom normals back to what they were when the operation started.
Other Normals Commands
- Split Normals (Mesh->Normals->Split): split the normals at all selected vertices so that there are separate normals for each face, pointing in the same direction as those faces.
- Merge Normals (Mesh->Normals->Merge): merge all of the normals at selected vertices, making one average normal for all of the faces.
- Smoothen Normals (Mesh->Normals->Smoothen): adjust the normals to bring them closer to their adjacent vertex normals. An adjustable Factor sets the strength of that adjustment.
- Average Normals (Mesh->Normals->Average Normals): average all of the normals in each fan of faces between sharp edges at a vertex.
- Set Face Strength (Mesh->Normals->Set Face Strength): set the 'face strength' of selected faces. The strength is set to Weak, Medium, or Strong, as specified by a submenu. Face strength can be used in the Weighted Normal and Bevel modifiers.
- Select by Face Strength (Mesh->Normals->Select by Face Strength): select faces with the face strength Weak, Medium, or Strong, as specified by a submenu.
- Copy (Mesh->Normals->Copy): if a single normal is selected, copy it (available in the Normal Vector box in tool settings).
- Paste (Mesh->Normals->Paste): replace the selected normals with the one in the Normal Vector box.
- Add (Mesh->Normals->Add): replace the selected normals with the result of adding the contents of the Normal Vector box to the current value and then renormalizing.
- Multiply (Mesh->Normals->Multiply): like add, but multiplying.
- Reset (Mesh->Normals->Reset): put normals back the default calculation of the normals.
Bevel Tool and Modifier improvements
A normal hardening option was added to the modifier, and some small improvements to the tool and modifier were made.
Bevel Modifier and Tool Harden Normals Usage
The following options have been added to the Bevel Modifier and Bevel Tool:
- Harden Normals: When enabled, the per-vertex face normals of the bevel
faces are adjusted to match the surrounding faces, and the normals of
the surrounding faces are not affected -- so the effect is to keep the
surrounding faces flat (if they were before), with the bevel faces
shading smoothly into them.
- For this to work, custom split normals need to be enabled, which you can do by checking the Auto Smooth option in the Mesh data properties, Normals section.
- Set Face Strength Mode: this can be used in conjunction with a
following Weight Normals Modifier (with the 'Face Influence' option
checked). Options:
- None - don't set face strength
- New - set the face strength of new faces along edges to Medium, and the face strength of new edges at vertices to Weak.
- Affected - in addition to those set for the New case, also set the faces adjacent to new faces to have strength Strong.
- All - in addition to those set for the Affected case, also set all the rest of the faces of the model to have strength Strong.
Bevel Modifier and Tool Miter Patterns
- Some options for the mesh pattern used at miters have been added. You
can separately set the pattern for 'outer miters' (those where the
angle in faces between two beveled edges is greater than 180 degrees)
and 'inner miters' (angle is less than 180 degrees). The miter choices
are:
- Sharp - this is the default, and what Blender has always used up until now.
- Patch - this replaces the outside vertex of a miter with 3 vertices, and uses a patch pattern there.
- Arc - this replaces the vertex of a miter with 2 vertices, joined by an arc. A separate Spread parameter says how far to move the vertices away from their original position.
Blender2.8 Bevel Sharp Miter.png|300px|Sharp Miter
Blender2.8_Bevel_Patch_Miter.png|300px|Patch Miter
Other Bevel tool and modifier changes
Vertex bevel for in-plane vertices now curve according to the profile.
Beveled seam and sharp edges now do a better job of preserving those attributes where it makes sense.
Subdivision Surfaces and Multires
Subdivision surface and multi-resolution modifiers have been ported to OpenSubdiv. The new integration replaces the previous subdivision surfaces entirely, and works on the CPU side. It brings the following immediate improvements:
- Better crease support, especially for non-manifold edges.
- Subdivision surface result will perfectly match adaptive subdivision in Cycles.
Note however there are still some missing features and performance problems in the new implementation. Particularly animation playback and moving of vertices in edit mode will be improved before the final 2.80 release, to bring it back to 2.7x level.
Further optimizations and features to be added later in the 2.8 series:
- GPU accelerated subdivision (as existed in Blender 2.7x with the Use OpenSubdiv option)
- Vertex creases support (to mark vertices as sharp or semi-sharp).
- Better interoperability with other software, by supporting options for UV and boundary interpolation.
Limit Surface
Vertices are now always put on the limit surface, which is the smoothest possible surface, as if one have applied infinite number of subdivisions. This means that with first subdivision level the object looks as smooth as it could possibly be. The image below visualizes different subdivision levels with old (Blender 2.79) and new OpenSubdiv subdivision surface modifier.
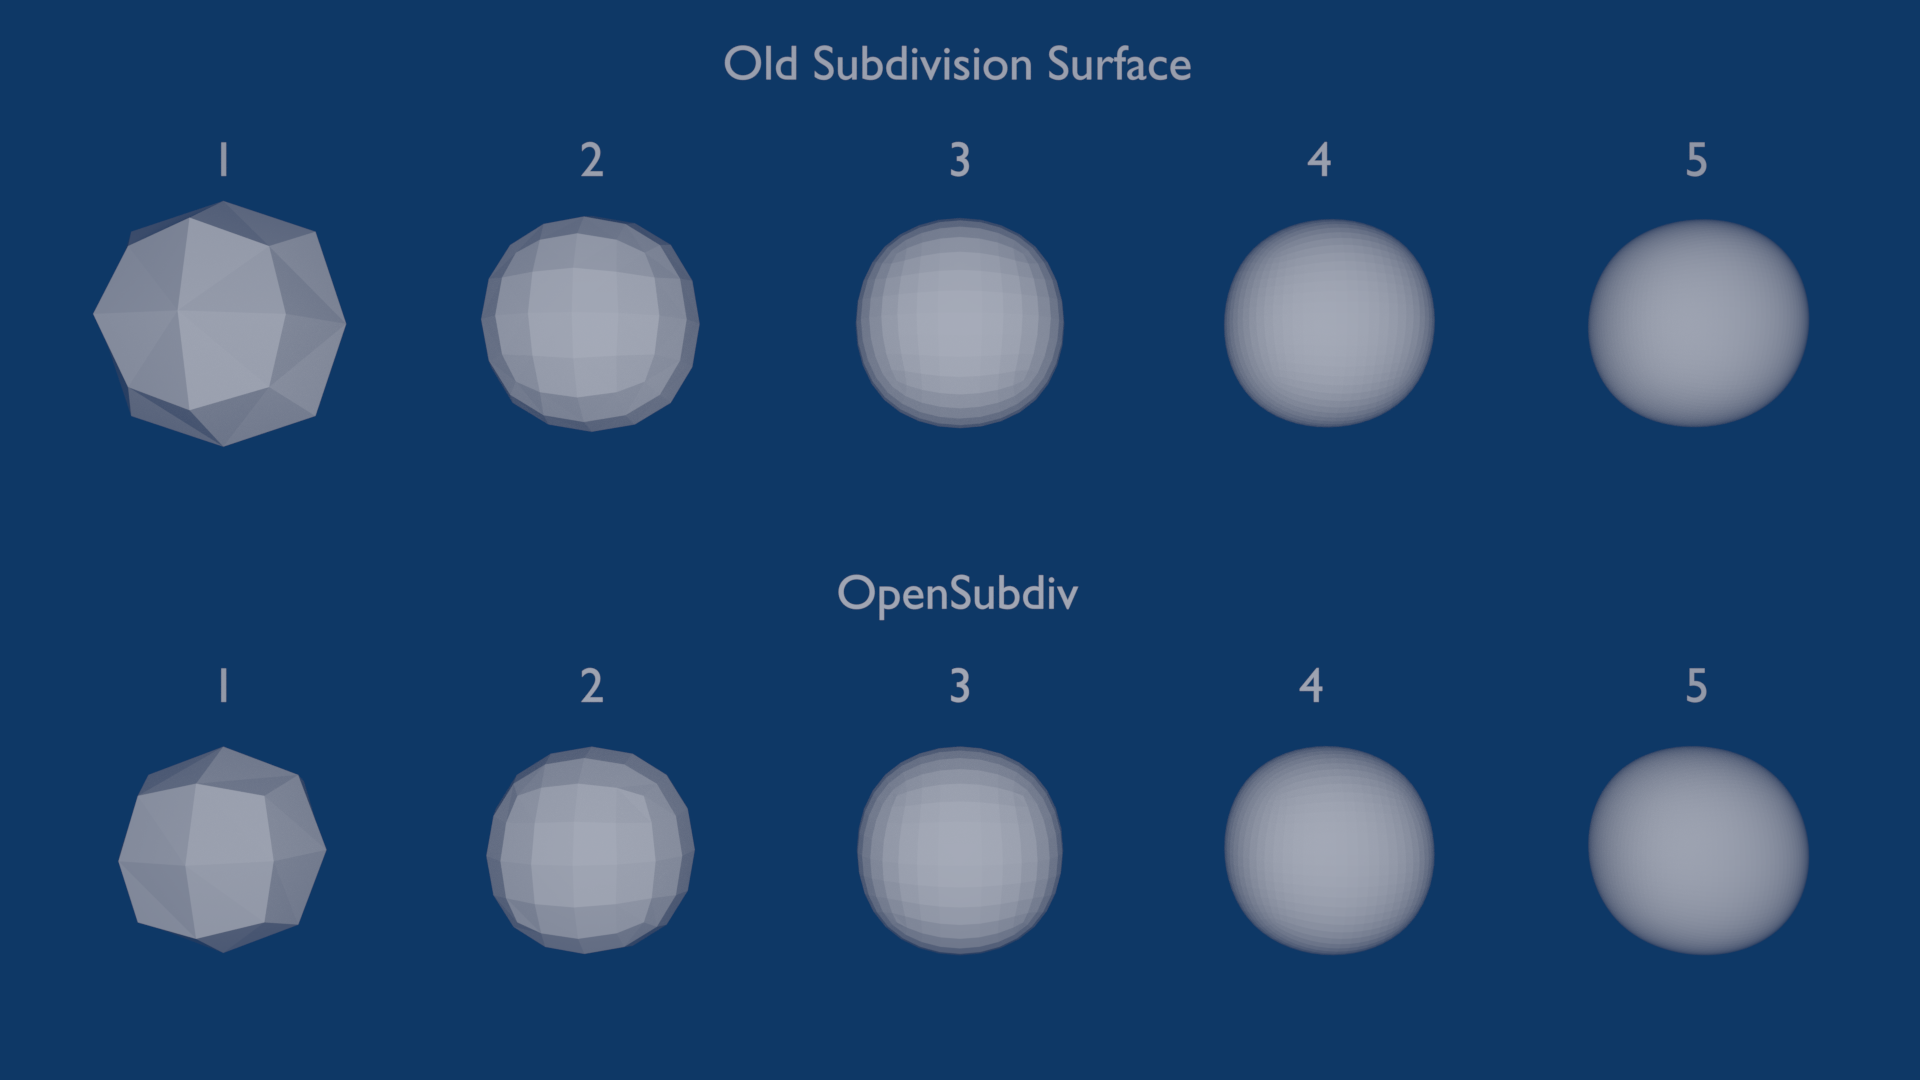
There is an extra setting which controls how accurate the limit surface is calculated. This option is called "Quality". Lower values means faster evaluation of subdivision surface/multi-resolution modifiers, but means lower quality of the final surface. This is mainly visible on an extra-ordinary vertices (vertices where, for example, triangles met). Quality also affects semi-sharp edges.
Unfortunately, there is no good universal value for the quality. Value of 3 is a good starting point, but it might be lowered for cases when mesh consists of quads and no semi-sharp edges exists.
The quality setting does not define how dense the final mesh is. This is controlled by the Subdivision Level setting. This setting behaves similar to old Blender, but one thing to mention about it is: it does not have dramatic performance penalty for the subdivision surface/multi-resolution modifier.
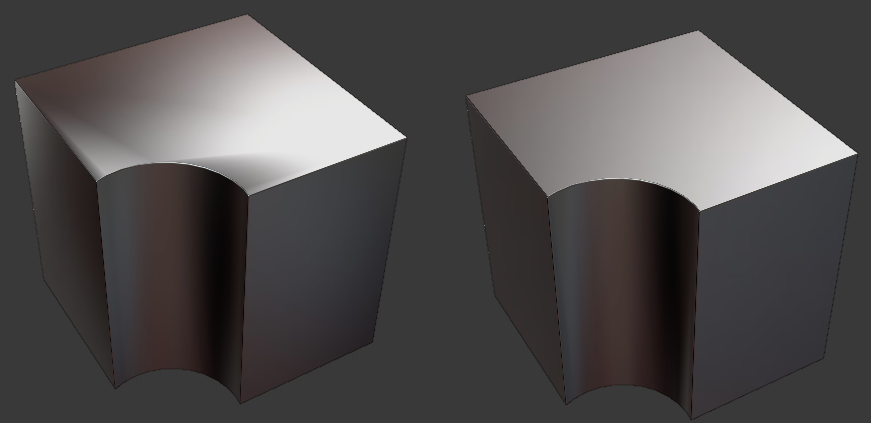
UV Smooth
The old "Subdivide UVs" options has been replaced with the menu-based option called "UV Smooth". There are two options available there:
- Sharp. It has same behavior as previously when "Subdivide UVs" was off.
- Smooth, keep corners. This is very similar to the previously "Subdivide UVs" on, but has different behavior for non-manifold meshes: non-manifold corners are no longer smoothed. This is illustrated in the following image.

In the future more smoothing options might be exposed to keep compatibility with other software. This will only be done if it's really high demand, since those options are rather obscure for artists.
Known issues and limitations
- The new modifier produces different order of vertices than the old one. This means, that if modifiers like Mesh Deform were bound in older versions of Blender, they are to be re-bound again.
- Sculpting on a lower levels of multi-resolution does not properly smooth sculpted strokes when applied to the higher levels. This is a crucial feature, which will be properly implemented before the final 2.80 release.
- GPU side OpenSubdiv is disabled, since it needs to be re-integrated into a new viewport rendering pipeline. This is a subject for 2.8x series.
Text improvements
Vertical alignment was fully refactored. Besides a new mode, we now support the ascent and descent from the font to determine the padding. Full control on how the text should behave when it doesn't fit in the text boxes.
Alignment fixes
- Bottom alignment was actually bottom-baseline.
- Top alignment now using font's ascent (recommended distance from the baseline).
- Font's descent used for the relevant modes.
- Full multiple-text boxes support.
Overflow methods
- Truncate: Clip away text outside the text boxes.
- Scale to fit: Scale down the text to fit within all the text boxes.
- Overflow: The default behavior, as found in 2.7x.